First, let me start off by really emphasizing the absolute awesomeness of this recipe.  This is, hands-down, one of the best rice recipes I've ever had.  It's delicious, moist, the coconut flavor is obvious without being overwhelming.  Honestly, my mouth is watering at the thought of this dish.  Four servings didn't last a day in this house.  It was awesome warm, it was awesome cold, it reheated really well and it was gorgeous to look at.

Second, in a week of intimidating recipes, this one was one I was really nervous about.  While I'm happy to say that I can cook pretty much everything, rice constantly gives me trouble.  I overcook it, I undercook it, it sticks to the pan, it burns, it doesn't fluff, it sinks...  You name any possible issue with rice, I've had it and probably sometime in the last 6 months.  Rice and I just don't get along.  I thoroughly anticipated screwing this dish up.

However, as with most things, I worried myself for no reason.  This recipe is, dare I say it, foolproof.  Even for those who are so cursed with rice as I seem to be.  I even forgot to set the timer and I managed to not mess it up.  I think that's saying something.

Of course, this makes a great side dish which I served with lemon cinnamon chicken (my own recipe, not a Disney one) and another recipe that I'll share more about tomorrow.  I made no changes to this recipe, other than leaving out the cilantro because I had none available.  

~~~~  °o°  ~~~~

Coconut Rice
As is served at Boma, Animal Kingdom Lodge

°o°  2 tablespoons canola oil
°o°  1/2 teaspoon garlic, minced
°o°  1/3 cup red onion, diced
°o°  1 cup Basmati rice (or long grain rice)
°o°  1 cup water
°o°  1 teaspoon Kosher salt
°o°  1 can unsweetened coconut milk
°o°  1/4 cup grated carrots
°o°  1/4 cup shredded sweetened coconut
°o° 
1 tablespoon Cilantro, finely chopped (optional)

Put oil in a saucepan over medium-high heat and allow to warm.  Saute garlic and onions for about 1 minute.  Add rice and stir quickly, until rice is warmed and coated with oil.  Add water and salt and bring to a boil.  Add coconut milk, stir, and cover.  Lower heat to medium-low (or to a simmer), and allow to cook for 15 minutes, stirring once about halfway through.  After 15 minutes, remove lid and add the carrots and coconuts, mixing well, simmering for an additional 5 minutes (if rice is too dry, add additional water in tablespoons).  Remove from heat and allow to sit for 5 minutes.  Fluff rice gently with a fork and adjust seasonings to taste.  Garnish with cilantro, if desired.

Serves 4
~~~~  °o°  ~~~~


It's been awhile since I've shared the "recipe" for one of Disney's classic and signature drinks, so I'm super excited to share this one.  This is a recipe I got years ago from the bartender at Banana Cabana, back when this drink was the signature (and I believe exclusive) drink of Shutters at Caribbean Beach Resort, my favorite resort hotel.

I believe it was the last night of our 2008 stay and I wandered over to Banana Cabana for one last drink before packing up and leaving in the morning.  The bartender, who has to be the friendliest bartender in the world, asked me the usual Disney questions, and we stumbled on the topic of Coral Reef Restaurant in EPCOT.  I talked about this amazing waiter who actually brought me two desserts because I was leaning towards the key lime pie when he said the Jack Daniels mousse was the best dessert in the world.  I ended up ordering the Jack Daniels mousse, mostly to appease our incredibly sweet and very insistent waiter, but really wished for the pie.  To my surprise (and happiness) he brought the mousse to eat and the pie to enjoy in my room after fibbing and stating it was my birthday in order to get us the extra dessert at no charge.  I said that it was an incredible and memorable bit of Disney magic.

The bartender smiled and told me that I "had to try" the key lime coconut martini.  The idea of key lime with coconut perked me right up, but I'm just so not a martini person.  It's just too strong for my weak tummy.  He smiled and told me if I didn't like it, it was no charge.  Willing to try any alcohol from a perfect stranger on the promise of not having to pay for it proved to be too tempting, and I took him up on his offer.  The thing looked exquisite and with the rim dusted with graham crackers, it even vaguely looked (and smelled!) like a key lime pie.  One sip and I was in heaven...  It was strong but the flavors all worked together so beautifully.  It was one of the few times I actually wished I could have more then just one glass.  The bartender was sweet enough to give me the recipe without me even having to ask for it, which is a good thing, since I'd have never remembered to ask for it on my own...  Did I mention that this sucker is strong?

And the bartender was nice enough to still give me the drink for free, saying that since I was going to order something else and only changed my mind at his suggestion, he didn't feel right charging me.  Disney magic with alcohol is the best thing ever.

In the years since I had this drink, it's become available all across Disney's properties, most notably Coral Reef Restaurant, Kouzzina (though the recipe may vary slightly) where it is a featured drink at various times of the year, as well as the other places that serve alcohol.  It's a delicious, though it's so strong, you may not remember how good it is the next day!

~~~~  °o°  ~~~~
Key Lime Coconut Martini
As is served at Shutters at Caribbean Beach Resort, Coral Reef at EPCOT, Kouzzina by Cat Cora at Downtown Disney, and numerous other eateries across WDW
 
°o°  1 shot Midori Melon liqeur
°o°  1 shot vanilla-flavored vodka (like Stoli)
°o°  3 shots liquid pina colada mix
°o°  1 shot pineapple juice
°o°  1 lime (or 5 key limes) (or 1-2 tablespoons lime juice)
°o°  graham cracker crumbs, for rimming the glass
 
Combine all ingredients but the lime.  Pour over ice in a cocktail shaker.  Squeeze lime into the shaker and shake vigorously.  Strain into a martini glass that's rimmed with crushed graham crackers (to rim, dip the edge of the glass into water, shake of excess, and dip into graham crackers.
.
~~~~  °o°  ~~~~
This awesome Stitch pin sets the mood, right?
This weeks odd theme comes from a brain cramp on my part, paired with dumb luck.  I had initially planned on making this a week about fruit and the various fruit dishes that you find around Disney.  Sounds like a great theme, right?

Well, in a fit of productivity that's somewhat uncommon for me (I like to do my cooking on Sunday for the blog and then spread it out over the week), I started doing my cooking on Friday, making two out of the five dishes and having all the ingredients for the other three ready to go.  Then Saturday night (because such realizations always come at night when you're trying to sleep) I was feeling quite proud of myself for being so far ahead of my normal schedule when I realized that two of the dishes I'd made had coconut...  And that coconut isn't a fruit, it's a nut.  D-oh!

I briefly considered keeping it fruit week and just explaining my embarrassing mistake in mentally identifying a coconut as a fruit, but that seemed like such a lame excuse for correcting my mistake.  Then I thought of shelving the two recipes and saving them for another week, but one recipe I made was so delicious and universally loved in my household that it seemed a shame to not share it.  That's when I realized, everything I'd made had either lime and/or coconut...  And voila!  A theme was born.

Yes, it's an odd theme created out of a combination of desperation and laziness, but hey, I think it works and it's given me a great set of dishes, perfect for summer. 

Also, this week or next, I'll be trying something a little new and different.  Either Friday or Saturday I'll be featuring a recipe that fits with the theme of the week, but isn't a "Disney dish," but we feel it should be.  This is something that I actually started on one of the forums I chat on when I made a dinner, shared the recipe and said "this was so good, they should serve it at Disney."  Then other folks started sharing recipes for meals they thought should be served at Disney.  From there, an inside joke turned into fun board on Pinterest where all sorts of people started submitting their "they should serve this at Disney" recipes.  As sort of a salute to this fun and eccentric group of recipe collectors, I wanted to give some of the recipes they've submitted something of a test run, then put it up to a vote...  Should Disney put it on their menu?
I can't wait to share my new dishes and I'm really looking forward to this week.  And I think what started as an odd solution to a mistake has turned into one of the most fun, and delicious, theme weeks I've done.
Have fun!
Here's one of the best types of recipes in my Disney recipe catalog...  Vintage Disney.  A recipe that not only captures a slice of Disney, but a slice of Disney from "back in the day."  Granted, a similar version of this dish is still in circulation around Disney, but let's be honest...  The number of dishes that call for two generous portions of dairy and fat have dwindled considerably.


The other fun thing about this recipe is it's authentic, very different from the Alfredo most people are familiar with, though almost exactly like the Alfredo I found across Europe.  No cream sauce, no milk, nothing beyond pasta, cheese, butter, and seasoning.  The magic of this dish is that the stars are the cheese and the pasta, creating this really vibrant and rustic dish that will hit you in a way very different from creamy Alfredo.

Because this dish is all about the simple flavors of pasta and cheese, the quality of the ingredients is key.  Shakey cheese in that green container and hard pasta will make a dish that will taste completely different from fresh pasta and grated Parmesan.  This meal is only as good as the ingredients you use and it's not the dish to use less-than-quality components.  Fresh pasta and fresh parm are key and will make, or break, the meal.  Go for the best and this Alfredo will make you wonder why you'd ever have that creamy substitute.


A note on the butter...  This recipe calls for butter, and a lot of it.  I was on the fence on how much to include and, in the end, I went with the full amount called for in the recipe.  In truth, this is supposed to have lots and lots of butter, but if it were me, I think half the amount listed in the recipe is more than enough.  On the flip side, I did add a little extra cheese with absolutely decadent results.  And keep in mind, this doesn't reheat well at all...  Plan to make only what you need or eat the leftovers cold.  I personally think it's great cold, almost like a pasta salad, but I know most would disagree.  I also think that leftover bacon from yesterday's meal would go really, really well crumbled up in the noodles...

~~~~  °o°  ~~~~
  Fettuccine Alfredo
As is served at Italy Pavilion, EPCOT

°o°  1 pound fettuccine noodles, fresh
°o°  1 cup butter, softened, cut
°o°  1/3 to 1/2 cup Parmesan cheese, fresh grated
°o°  Black pepper, freshly cracked
°o°  Additional Parmesan cheese, garnish

Drop fettuccine into boiling salted water and cook until it floats to the top of the boiling water, about 2 to 3 minutes.  Drain immediately (do not rinse) and return to pot.  Add softened butter and cheese, tossing noodles until well coated.  Season with pepper and additional cheese, if desired.

Serve immediately.
~~~~  °o°  ~~~~


When it came to cheese week, believe it or not, I actually wasn't going to include this recipe.  Let's be honest, it seems like an overly obvious choice, and it seems like everybody already has the recipe.  But the more I thought about it, the more I really felt like I had to include it.  It is, after all, Disney's most requested recipe.  It's also the dish that introduced the idea of signature dishes and recipes at Disney...  It's so overwhelmingly popular that it's survived numerous menu changes, and while the recipe has changed over the years, at its core, it remains the same.  Besides which, this soup is mind-blowingly awesome, as to be expected in any recipe where the primary ingredients are cheese, beer, and bacon.  Just one taste and I'm back at EPCOT.


The tricky thing about this recipe is that, while it's easy to make, it's hard to find all of the exact ingredients used at Le Cellier.  Moosehead Beer and Nueske’s center cut bacon are both Canadian and, even though I live about one tank of gas away from Canada, finding these brands is tricky, at best.  Substituting the bacon is easy enough...  Stick with center cut bacon, preferably just straight bacon, not low sodium, maple cured, thick cut, etc etc.  The beer, however, is a trickier prospect as it has the potential to change the taste of the whole dish.  I've used beers like Guniness or local favorites, pale ales, all with a lot of success.  This last time, however, I used the only thing I could find (and just happened to be Canadian) that was sold outside of a six pack...  Labatt Blue.  I have to say, I was disappointed as I wanted something a little more fun, authentic, closer to Moosehead, and less "commercial," but honestly, using this gave me the best batch of soup I've ever made.  I really recommend it.  As for the cheese, until recently Le Cellier has been using Canadian Black Diamond white cheddar.  If that can't be found, any medium/mild white cheddar cheese will work just as well.

Now, about the recipe itself...  When the soup was first introduced to the menu, it included very simple, core ingredients.  Cheese, beer, bacon, flour, and milk, along with seasonings.  As time has marched on, the recipe has changed to include more traditional soup base ingredients such as celery, onions, and carrots.  I honestly prefer the original recipe, which is essentially the same, just leaving out the extra veges, extra butter, and reducing the flour to about 1/3 cup.  Don't be afraid to make a double batch...  It reheats beautifully, only gets more delicious as it "ages," and with a splash of milk and/or beer, it comes back to life.  And if you're a bacon lover like I am, there's certainly no law against using the whole pound of bacon instead of the half pound...  


~~~~  °o°  ~~~~
Canadian Cheddar Cheese Soup
As is served at Le Cellier Restaurant, Canada Pavilion, EPCOT

°o°  1/2 pound center cut bacon, cut into 1/2 inch strips
°o°  1 medium red onion, diced
°o°  3 celery ribs, diced
°o°  4 tablespoons butter
°o°  1 cup all-purpose flour
°o°  2 cups chicken stock
°o°  4 cups milk
°o°  3/4 pound grated white cheddar cheese, medium or mild (Canadian Black Diamond)
°o°  1 tablespoon Tabasco sauce
°o°  1 tablespoon Worcestershire sauce
°o°  Salt and pepper, to taste
°o°  1/2 cup warm beer
°o°  Chopped scallions or chives for garnish, optional
In a large pot or Dutch oven, cook the bacon over medium heat until lightly browned.  Remove a spoonful to use as garnish.  Add the onion, celery, and butter, sauteing until the onion is softened.  Over medium heat, add the flour and stir, creating a thick paste-like roux.  Slowly whisk in the broth and bring to a boil.  Boil for about 1 minute, then reduce to a simmer, simmering for about 15 minutes, allowing the soup to thicken.  

After the soup has thickened, whisk in the milk and bring to a gentle simmer, not allowing the mixture to boil.  Remove from heat and whisk in cheese until the soup is smooth.  Add Tabasco sauce, Worcestershire sauce, and beer.

Serve warm, garnish with scallions/chives and bacon.  To reheat leftovers, add milk and reheat until warm, not allowing the mixture to boil.

~~~~  °o°  ~~~~


I was going to try so hard to save this recipe (Kaze Spatzle from Biergarten) for later in the week, but I was so excited to share it, I ended up doing it first.  Isn't that always the way?  I'm so bad at waiting!  And this recipe, like all really great recipes, has a story associated with it.  But first, a little background on the dish.

Spatzle is a distinctively German dish, translated quite literally to "little sparrow," and it's like a cross between an egg noodle and a dumpling with a texture that ranges from fluffy like scrambled eggs, to more al dente.  In Germany, you find it served almost like one would find mashed potatoes in the US, and they're served with everything from butter to gravy, even with cherries for a sweeter dish.  Finding them as a side dish for all meals, breakfast, lunch, and dinner, isn't that uncommon at all.  They are very much a staple of German cuisine.  


Now, my family is German, my mother is actually first generation as both her mother and father (my grandparents) came to the US from Germany just before World War II.  Pair that with spending two summers in Germany, it goes without saying that I've had a lot of spatzle in my time.  When I went to Germany I had the fresh stuff daily, and since you can actually find it like dried pasta in the international section of most grocery stores, I had a pretty steady amount of it stateside as well.  I'm sure everybody has a food that, just the sight of it, triggers 100 happy memories...  Spatzle is mine.

When I turned 18 I got my very first cookbook as a birthday present and it actually had a recipe to make fresh spatzle.  I was so happy to see that not only was it super simple, that it had none of the steps that makes it tedious to make from-scratch pasta at home, and the ingredients were all very basic and easy to find.  I made a batch on the spot and I was hooked on doing it myself ever since.  I'm actually a little proud to say that my spatzle is something of a family tradition.  I make it for Thanksgiving and Christmas, and various special family events through the year.

 
I will freely admit that the way I make spatzle would make a German housewife proud, and a chef cry.  Most of the time when you order a dish that has spatzle, it's made using a spatzle press.  What it makes are pea-like little dumplings called Knöpfle or "tiny buttons."  It makes very uniform noodles that, on a whole, are considered more attractive and presentable.  Occasionally you'll see one that works a lot like the noodle attachment on a Play-Doh and it'll make ribbon or thick, spaghetti-like noodles.  However, the traditional method of making spatzle is to scoop small amounts of batter using a fork or a spoon with numerous large holes, dropping large ribbons or globs of the batter into boiling water.  The noodles were all of various sizes and textures, but despite this, it was nearly impossible to over or undercook them.  When the dough was dropped in boiling water, it sank to the bottom, and when it was fully cooked, it'd rise to the surface.  In fact, that's where the name came from...  The whispy noodles floating to the top of the boiling water amidst the froth created during the cooking process looked like a flock of little sparrows in the clouds.


Spatzle dough itself is a wonderful medium for adding all sorts of little flavor boosters.  I've put herbs and finely minced garlic in the dough and, while not traditional, it sure tastes good.  I also love to boil the noodles in chicken broth or very heavily salted water, though never add oil or butter to the boiling water.  It doesn't do much to prevent sticking, and it messes with the texture of the noodle.  Instead, add the butter after it's come out of the water.  Speaking of butter...  Use a lot of it, even if you plan on putting another sauce with it.  It keeps the noodles from sticking and buttered spatzle is the best thing in the world.  


It goes without saying that this dish is amazing...  I love how it tastes exactly like German kase spatzle, and I love that they actually cook it using the traditional method of just chucking the cheese and butter in, as opposed to making a sauce from flour, butter, and milk and melting the cheese into that.  All that's missing from this dish to make it authentic German, and exactly like dining at Biergarten, is the German band.  

~~~~  °o°  ~~~~
Kase Spatzle 
As is served at Biergarten Restaurant, Germany Pavilion, EPCOT

°o°  1.5 lbs all-purpose flour
°o°  4 oz semolina flour
°o°  1.3 oz salt
°o°  3 cups eggs
°o°  1/4 c butter
°o°  salt, to taste
°o°  ground white pepper, to taste
°o°  ground nutmeg, to taste
°o°  1 cup diced onion 
°o°  1 c grated Swiss cheese
°o°  1/4 cup chives, chopped

Mix the flour and salt until combined.  Mix in eggs until the texture is firm, but still wet, like a dumpling dough.  If the batter is too stiff, add a very small amount of milk.

Fill a large stock pot with salted water and bring to a rolling boil.  Using a spatzle press, a slotted spoon, or a fork, press the dough through the holes using your fingers.  The dough will sink to the bottom, but rise to the top once it has cooked entirely.  Remove from the water using a slotted spoon, pasta spoon, or spider.  Allow to stand for a moment to dry out.  

Saute the cooked spatzle with onion in a skillet with butter until golden. Season with salt, pepper and nutmeg. Add the grated Swiss cheese and mix well.


~~~~  °o°  ~~~~


This week's theme just sort of came to me.  I was poking around my recipes, kind of trying to get a feel for where I wanted to go this week, when I noticed that all of the recipes I'd marked as wanting to try out had one wonderful, ooey, gooey, delicious thing in common...  Cheese!  

Of course, Disney has some pretty popular cheese-based recipes.  I mean, do I need to even mention the epicness that is Le Cellier's soup?  I didn't think so.  And only Disney could come up with a mac and cheese recipe that is so fantabulous that when it was removed from the list of side dishes available for their signature steak at a popular resort, people went into mourning.  Even the cheese platters served at various restaurants across Disney are legendary.  

The only tough part for me is narrowing down my choices...  It really doesn't help that all my favorite foods involve heavy, almost inhuman, amounts of the good stuff, does it?

Here's another one that I was just so excited to try out for one, very fun little reason...  This dish has been officially "retired" from the menu, but back in the 80's, it was one of Liberty Tree Tavern's signature dishes.  I don't know why, but it always fascinates me to see how we treated food then compared to how we treat it now.  I dare say that there's no place out there that would thin-slice a sirloin and cover it with gravy before sending it out to a table!

You can tell that every inch of this recipe is very 80's cooking style, and it's just so cool.  Of course the dish is delicious, but compare that to how Disney treats a steak now...  It's an entirely different experience.

I made no significant changes to the recipe, other than leaving out the mushrooms due to allergy concerns.  The steaks themselves were pan-fried, then put in a broiler until cooked to desired doneness.  I'm a rare, medium-rare girl, and I think it looks pretty dead on.

~~~~  °o°  ~~~~
Thin-sliced Sirloin Steak with Herb Sauce
As is served at Liberty Tree Tavern, Magic Kingdom

°o°  6 12-ounce sirloin steaks, broiled or grilled as desired
°o°  2 12-ounce cans brown gravy
°o°  2 beef bouillon cubes
°o°  1/4 cup Dijon Mustard
°o°  1 clove garlic, chopped
°o°  1/4 teaspoon black pepper, fresh ground
°o°  1 tablespoon Worcestershire sauce
°o°  1 tablespoon butter
°o°  10 large mushrooms, sliced (if desired)
°o°  1/4 cup brandy

Keep steaks warm.
In a 4-quart saucepan, mix brown gravy, beef bouillon cubes, Dijon mustard, garlic, pepper, and Worcestershire sauce together.  Bring to a simmer and cook 10-15 minutes, stirring constantly to prevent burning and sticking.

In a small skillet, melt butter and saute sliced mushrooms.  Add brandy and flambe quickly.  Add mushrooms to the gravy and mix well.

Just before serving, thin-slice the steak and fan it on a plate.  Serve warm sauce over steak.  Also great as a dressing to potatoes.
~~~~  °o°  ~~~~


Happy July 4th everybody!  Who's ready to celebrate the birth of our nation by eating too much food, drinking a few cold beverages, and watching a few fireworks!  I know I am.

Today, I was going to post a recipe for a gorgeous steak I made the other day, but then I heard on the weather that after this morning's drenching rain that temps were going to skyrocket into the upper 90's with humidity at 90%, I decided that regardless of how awesome steak sounded, today was just a day for a really cold drink.  And when it comes to cold drinks, Liberty Tree Tavern has a signature that they've been serving in various forms for over 30 years...  The Patriot's punch.


First, let me just tell you, this drink hits the spot.  I'm not normally a fan of orange, or sherbert, or Sprite, but somehow it all comes together in this drink.  That said, I have no idea why it's called Patriot's punch.  The thing is orange and I really don't think a colonial Patriot had Sprite or sherbert back in the day.  The best that I can guess is that this drink is the non-alcoholic answer to a beer as, when it sits, a creamy foam rises to the top, leaving the drink a very rich color.  In a glass like the one they have there at Liberty Tree Tavern, it almost looks like a beer.  Am I reaching?  Well, yes...  But it sounds better than admitting it was a nice, fast, inexpensive drink to serve at Liberty Tree that is only named as it is to tie it into the theme better, doesn't it?


Happy July 4th everybody!  Enjoy, be safe, and eat like you're at Disney.

~~~~  °o°  ~~~~
Patriot's Punch
As is served at Liberty Tree Tavern, Magic Kingdom

°o°  1 pint orange sherbert (about 2 cups)   
°o°  1 cup Sprite
°o°  2 tbs lemonade concentrate

°o°  3/4 cup water
Remove sherbert from freezer and allow to sit at room temperature for about 5 minutes.  Place it in mixing bowl and beat until smooth on low speed.  Once smooth, add remaining ingredients and continue mixing on low speed until combined.  Pour into a pitcher and refrigerate for up to 30 minutes or serve immediately. 
~~~~  °o°  ~~~~


Edit ~ This post was originally started with the intention of posting on the week honoring the somewhat eclectic palate of my 2-year old.  However, life got in the way and I missed the day that it was to be posted.  I put the entry on ice for a few days, deciding to bust it out during a really special occasion...  And that happened today!  The Disney Chef reached 100 followers on Facebook!  Woo-hoo!  I'm so happy, and lucky, to have such an eager and active group of followers who have been fooled into thinking I'm a better-then-average cook.  As promised, to celebrate, here's that long lost special recipe!

~~~~

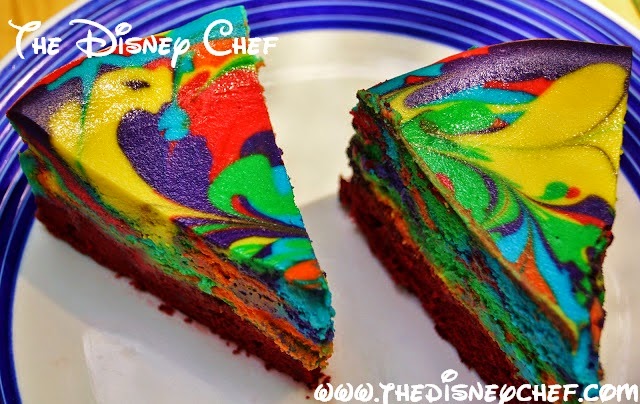
I have an admission to make...  When I thought about doing this blog, the very first thing that came to mind as one that I just had to try at home was the tie dye cheesecake from Pop Century's food court.  Ever since the first time I had it during a trip in January 2012, I just fell in love with everything about it.  The colors are so funky, the cheesecake itself was incredibly light and airy, and a crust of red velvet cake?  Whomever dreamed that one up deserves an award.  In truth, the Pop Century food court was, I think, just about the best counter service at a resort in Disney World.  I have so many great memories of being in the parks until closing, hopping the bus after a long and inevitably amazing day to one (or more) of the parks, arriving back at the resort to the bustling food court and snagging one of these guys before sliding off to a table, to the room, or to a lounge chair next to a pool to unwind.  Is it sad that I would spend more than a couple moments looking at the slices that were there and trying to find the one I thought was the prettiest?
This recipe is somewhat involved, creates a lot of dishes, and can be somewhat intimidating to folks like me who don't bake a lot of their cheesecakes.  But the payoff is so worth it, and there are a few tricks to help you along the way.


The biggest tip to remember is to start with all of the ingredients for the cheesecake at room temperature, even the eggs.  This cheesecake is thick and hearty and if the ingredients are cold, the cheesecake will not cook all the way through and it will not set in the middle.  The tradeoff in this is that your cheesecake is especially prone to expanding and subsequently cracking in the center, especially for those who have ovens where it may run a little hot or a little cold.  While a cracked cheesecake tastes the same, and an over expanded cheesecake is still edible (though your oven will pay the price).  You should have seen me checking this cheesecake over and over as I forgot this little issue...  To prevent this, make sure you keep a little expanding room by not over-filling your pan.  Also be sure to not overmix the cheesecake filling...  The more you mix, the more it expands.

Should you find yourself with a cake that has expanded to new heights, open the oven door a crack and leave it open for about 5 minutes before shutting it again.  When you cake has cooked through both the hour of active heat in the oven and the hour setting in the oven, remove it from the oven and allow it to sit for about 3 minutes, then using a small knife, run it along the edge of the cake, between the pan and cake.  By freeing it from the side of the pan, the expanded cake should be able to contract or shrink back down without splitting (the splits are sometimes caused by the cake clinging to the pan and, as the cake contracts, it doesn't unstick from the pan, causing the cracks).


The nice thing is, if it cracks, no big deal.  The tie-dye effect does well to camouflage any boo boos.  If you cut the cake into slices before serving, chances are it will go unnoticed anyway.  And speaking of slicing, make sure you use a large knife, stick it in point first along the edge, then push the knife down to make your cuts.  Sticking the knife in and pulling it through, like a pizza slicer, will muddy the tie-dye.  Also wipe your knife between each slice for the cleanest cuts.

My last note on the recipe...  This recipe says it only makes one cake, but between the amount of cake that is made vs how much is used, and by the amount of cheesecake there is, I think you can quite easily make two 9-inch cakes.  If you want only one with a super large section of cheesecake (like I did), there will still be both extra cake and cheesecake mix...  What you do with it is up to you.  I made another cake, this time with more cake and less cheesecake so it was like a frosting.  Very delish as well.  But who didn't think it wouldn't be?


~~~~  °o°  ~~~~
Tie-Die Cheesecake
As is served at Pop Century Resort


°o°  1 package red velvet cake mix (plus ingredients to make it)
°o°  1 1/2 lb. cream cheese 
°o°  1 1/3 cup sugar 
°o°  5 large eggs 
°o°  16 oz sour cream 
°o°  1/4 cup flour 
°o°  2 tsp vanilla 
°o°  2 tsp lemon juice
°o°  food coloring in primary colors to make red, orange, yellow, green, teal, and purple

Prepare the red velvet cake mix as directed in a greased pan.  Pour 1/3 of batter into a 9 inch spring form pan and bake at temperature directed on the package.  Note: cooking time may be reduced significantly.  Cake will be done when the surface is spongy to the touch and a toothpick inserted in the center comes out clean.  When cake is done, run a knife along the edge of the pan to loosen and allow to cool.
Before swirling
Reduce heat to 325.

Using ingredients at room temperature, beat the cream cheese until light and fluffy on low.  Add sugar, a little at a time, and beat until creamy.  Add eggs, one at a time, beating well.  Add flour, vanilla, lemon juice, and sour cream and mix only until incorporated.  

Divide batter into 6 bowls and using food coloring (either paste or powder if possible), and color one of each red, orange, yellow, green, blue, and purple.  Drop large spoonfuls of colored batter over the red velvet cake in the spring form pan, leaving 3/4 inch of space (at least) between the top of the batter and the top of the pan.  Using a toothpick, slightly swirl the batter to create a "tie-dye" effect.
After swirling!

Place in the middle of the top rack of the oven and bake for 1 hour and 15 minutes.  The cake will not be set completely at the end of the first baking process.  After the baking time has finished, prop open the oven door and leave the cake in warmed oven for an additional hour.  After the hour has passed, remove from the oven and allow to cool to room temperature, about an hour, before refrigerating for at least 12, but ideally 24, hours.

To serve, run a knife around the edge of the cake and pan several times before removing the sides of the springform pan.  Slice and serve.


~~~~  °o°  ~~~~