Sausage Gravy from Whispering Canyon Cafe on thedisneychef.com

Sausage gravy...  Who doesn't love sausage gravy?  I mean, it's creamy, savory, and just a great way to start the day.  Whenever I go somewhere for breakfast and see sausage gravy on the menu, I do a little happy dance in my chair.  It isn't the easiest to find in New England, so I think it's worth a little chair dance.

I think it goes without saying that any sausage gravy served at Walt Disney World would also be worthy of a little chair dance, which probably explains the requests I've gotten for the recipe over the last few weeks.  It seems people really, really want to know how to make Whispering Canyon Cafe's famous sausage gravy.  Served on a platter as part of their all-you-can-eat skillet or as a delicious side on top of a homestyle buttermilk biscuit, this is the best way to get a sausage gravy fix.  I may even stay here at Wilderness Lodge one day...  Just for the gravy.

There are no super secret tricks to this recipe and I think many will find that this is a pretty standard recipe for this southern classic.  In fact, it's pretty close to the recipe I use when I make it at home.  While this recipe is pretty much perfect as-is, some fun ways to dress it up include adding a bit of nutmeg or maple syrup, or switching out black pepper for something spicier.  My secret recipe for sausage gravy includes adding a shot of rum...

Serve this on top of your favorite carb.  Homestyle biscuits, potatoes, toast, or for those who really like a hearty meal, with omelettes or sliced ham.


~~~~  °o°  ~~~~

Sausage Gravy
As is served at Whispering Canyon Cafe, Disney's Wilderness Lodge Resort
 
°o°  1 pound ground sausage  
°o°  3 tablespoons flour  
°o°  1 1/2 - 2 cups of milk  
°o°  Salt, to taste  
°o°  black pepper, to taste  

Cook sausage in large skillet over medium-high heat until browned, cooked through, and no pink remains.  Stir in flour and stir until completely incorporated with sausage fat.  Add milk and whisk.  Bring to a boil and allow to boil whisking constantly, 2-3 minutes, or until thickened.  Remove from heat and add salt and pepper to taste.        


~~~~  °o°  ~~~~

It's no secret...  San Angel Inn is my favorite place to eat on property.  The ambiance, the atmosphere, and the food are among the best in Epcot and Walt Disney World.  Plus, with a slow-moving, relaxing ride that never has any line about 30 feet away?  Perfect.  There really is nothing better in this whole world than filling up at San Angel then rolling over to the "Gran Fiesta Tour" to take it easy.

San Angel Inn has gone through a lot of changes over the years, including an extensive menu overhaul in the mid-to-late 2000's.  While most of the signature dishes made the cut into the new menu (Pollo A Las Rajas and Sopa Azteca), there were a few that were retired or made seasonally available to help bring the restaurant to a more fine dining experience.  One of these dishes was the queso fundido.

The collective mourning that San Angel Inn fans went into at the loss of this popular dish was undeniable.  Pop through forums and blogs at the time it was announced it was retired and it's not hard to find people begging for how to make this hearty guilty pleasure.

I'm happy to say that the folks at San Angel Inn have always been happy to oblige on any recipe when they could, so despite retiring the dish at San Angel Inn, they were happy to share how to make the dip at home.

And I wonder if the demand for this dish and the response of people when they saw it was no longer on the menu played a role in queso fundido finding a new home in the neighboring restaurant, La Hacienda de San Angel?  I will say, of all the establishments I've gotten and reproduced recipes for, the folks at San Angel Inn are in a league of their own when it comes to listening to their customers.  I wouldn't be at all surprised if they brought back this popular dish to their sister restaurant to appease the queso fundido addicts of the world (like myself).

When people read this recipe, they'll be over-the-moon at how ridiculously simple this is to make an appetizer this delicious.  For those who're making it in the style of San Angel Inn, all you need is two ingredients: cheese and chorizo sausage.  For those who're making the updated sister version as featured at La Hacienda de San Angel, you need to add a third ingredient...  A dash of poblano pepper.  Really, it couldn't be easier.  Cook, broil and serve with your favorite chips or flour tortillas.  Keep in mind, this isn't a dip where you stick your chip in and scoop out the cheese.  Think of this as a warm spread, not a traditional dip.  You'll need a spoon to scoop it out and spread it on your delivery food of choice.

Now, I think it goes without saying that an appetizer that's made up of cheese and sausage is not a low calorie, low fat, diet friendly food.  And I can't stress enough, if you don't really blot the fat out of the chorizo, you'll end up with a lot of fat rising to the top during the broiling process.  Really drain the sausage, then blot it with paper towels.  Blot it, blot it, and blot it again.  Then blot it again once more, for good measure.  If you broil it and there is still a lot of visible fat, just let it cool slightly and blot it gently with a paper towel.

I'm still dreaming about how delicious this dish is...  And I just made it about 12 hours ago.  I am in love with everything about this dish and it makes me so homesick for a riverside table in the shadow of a pyramid.  Sigh...  San Angel...    


~~~~  °o°  ~~~~
Queso Fundido
As was served at San Angel Inn, Mexico Pavilion Epcot with adaptations for as it is served at La Hacienda de San Angel, Mexico Pavilion, Epcot
 
°o°  1/2 pound Muenster cheese, grated  
°o°  1/4 pound chorizo sausage, in links with casing or ground  
°o°  poblano peppers (optional)  
Roughly cut chorizo in large chunks (if in a link sausage remove casing).  Add to a warm saute pan and cook over medium, medium high heat until browned.  Stir constantly and, as the sausage cooks, break it up further with a spatula or spoon.  When sufficiently cooked, drain on paper towels.  Turn and blot sausage repeatedly, absorbing as much fat as possible.

Preheat broiler.

Spray an oven and broiler proof shallow, small dish very, very lightly with non-stick spray.  Layer half of the grated cheese at the bottom of dish.  Layer chorizo sausage over the cheese, then top with remaining cheese.  Broil until cheese melts and begins to brown, or 5-12 minutes.  When done, cool slightly and serve (blot surface fat if needed).

Serve immediately with chips or warmed flour tortillas.


~~~~  °o°  ~~~~

Being a Northerner, I think it's fair to say my experience with barbecue isn't what most people in the southern half of the US enjoy.  While I've had awesome barbecue before, and we even have an amazing BBQ joint a few hours away, it just isn't something I get a chance to eat a lot.  Even when I make it, which isn't often, I tend to either rely on sauce from a bottle or a sauce I kind of trial-and-error my way through to something that, I think, tastes pretty good.  So I was pretty pumped to try a tested, and really popular, barbecue sauce recipe from Boma.

This is super easy to make, even for barbecue newbies like me.  I think the big trick is making sure you don't burn the brown sugar and allowing enough time for the Coca-Cola to reduce to a syrup.  It does take about 20 or so minutes, and all but 17 of those minutes I asked myself "is this really going to reduce or did I mess something up?"  Trust me, it takes what feels like forever, but it does get there.  Eventually.

Overall, I think the sauce is pretty delicious.  It is the right combination of sweet, spicy, and tangy.  I was surprised I couldn't really taste the Coca-Cola like I thought I would, but it was delicious.  It was a pretty big hit around the house too.  I think I, finally, I have a great barbecue sauce recipe for those days I want to make my poor, New Englander attempt at barbecue!

It also kind of gets me a little anxious to try Boma...

~~~~  °o°  ~~~~

Coca-Cola Barbecue Sauce
As is served at Boma, Animal Kingdom Lodge
 
°o°  1 tablespoon olive oil
°o°  1 onion, diced  
°o°  1 ounce minced garlic  
°o°  2 jalapeno peppers, seeded, minced  
°o°  4 ounces brown sugar, packed 
°o°  24 ounces Coca-Cola
°o°  2 ounces vinegar  
°o°  2 cups ketchup
  
In a large saucepot, warm olive oil and onions and cook until caramelized.  Add garlic, peppers, brown sugar and cook until brown sugar melts.  Stir constantly.  Quickly add Coca-Cola and deglaze the pan.  With heat at medium high, reduce mixture until a thick syrup, about 20 minutes.  Stir frequently.  Add ketchup and whisk.  Return to a simmer and allow to cook another 20 minutes.  Serve warm or cool.


~~~~  °o°  ~~~~

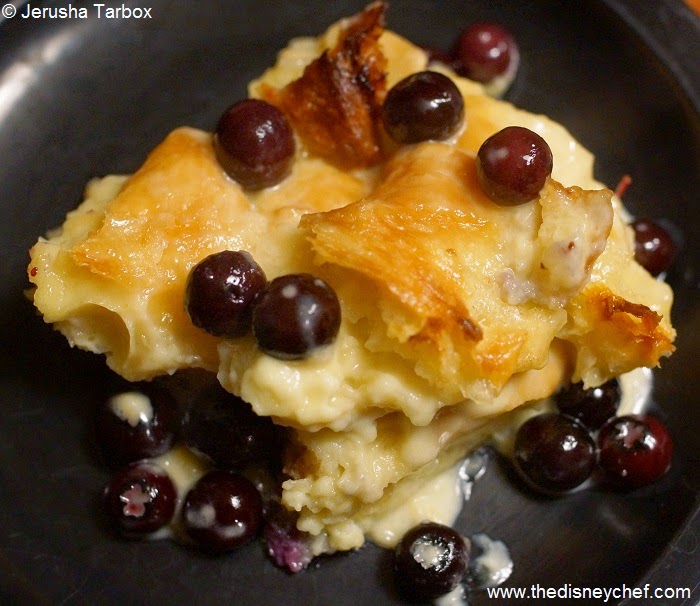
First, thanks to vacations at Walt Disney World, I have discovered that I love bread pudding.  Love it.  In fact, I'd say that now I'm developing what could be considered an unhealthy obsession with it.  While I wouldn't say I'm a bread pudding expert, I'd like to say I know the good from the bad from the exceptional.

This brings me to my second point of today...  Whomever invented this recipe is a genius. A complete and total genius.

I'm a big fan of Sunshine Seasons in The Land building and I always have been.  If they could somehow figure out how to bottle the smell of the inside of that building and then sell it, it would be one of the happiest days of my life.  Anyway, to me Sunshine Seasons is one of my special happy places.  Ever have a favorite spot that, when you visit, you feel you're finally at Disney and your vacation has really started?  The Land and Sunshine Seasons does exactly that for me.  There was a time where a stop for a meal there used to mean I just finished riding Soarin', I was about to go ride Soarin', or I had just gotten my paper Fastpass to go ride Soarin' later.  I remember the first time I ate there, I was surprised by how good the food was and how, despite how full the seating area was, the wait for food was never really that long.  I guess that's why I somewhat irrationally think of it as my private spot...  Strange since it's one of the busiest areas in Epcot.

While I've been to Sunshine Seasons numerous times, I somehow never got around to
trying this and I so totally regret it now.  Croissants?  Blueberries? Bread pudding?  This was made for my mouth.  It's on my "must eat" list for next trip...  And it's also on my "I'm going to make this all the time" list for at home.

This is fast and easy, almost impossible to mess up.  The crust is crunchy, the inside is sweet, moist, and almost has a pillow-like texture.  The blueberries make the whole thing fresh and just oh-so-yummy.  The right mix of buttery bread and sweetness, I think this may challenge Tusker House's banana bread pudding as best bread pudding on property.  And did I mention, while it doesn't make the kitchen smell like The Land building, it does make your house smell like cakes and blueberries.  No complaints on that here!


~~~~  °o°  ~~~~
Croissant Berry Pudding
As is served at Sunshine Seasons, The Land Pavilion, EPCOT
 
°o°  5 eggs  
°o°  24 ounces heavy cream
°o°  3/4 cup sugar
°o°  1 tablespoon vanilla  
°o°  1 pint blueberries  
°o°  1 pound croissants   
Preheat oven to 375.

Combine eggs, cream, sugar, and vanilla.  Set aside.

Tear croissants into large pieces.  In a large baking dish sprayed with non-stick spray, spread about half of the croissant pieces in one layer in baking pan.  Scatter with a layer of blueberries.  Top with remaining croissant pieces and blueberries.  Pour in liquid and sugar mixture and allow to soak for 10-20 minutes or overnight.

Bake in 375 degree oven for 1 hour until liquid is absorbed and mixture is cooked through.  Serve immediately.


~~~~  °o°  ~~~~

I've never tried anything from Victoria and Albert's and boy, this recipe has me thinking I should save my pennies and give Walt Disney World's ultimate luxury dining experience a try.

Victoria and Albert's is located at Disney's Grand Floridian Resort and is one of the most acclaimed restaurants not only in Walt Disney World, but central Florida.  It has the highest luxury fine dining reviews on TripAdvisor and Yelp, and it's one of only three restaurants in all of Florida to have AAA's 5-Diamond Award.  During your two hour experience, you have not just one, but two servers who work with each person individually to craft your own personal menu that's laid out over six courses.  That is, unless you sit at the Chef's Table...  Then you get your own Executive Chef who comes out and consults on your 11 course meal over three or four hours.  No big deal, right?

This is one of the highest levels of fine dining out there.  Men wear dinner jackets, women wear dresses or pantsuits...  They also (somewhat controversially) have a policy to not seat children under the age of 10 due to the size of the dining room and acoustics which command a quieter dining party.  I can't think of any restaurant at Disney that has table side sommilers to help you find individual wine pairings per course.  Very fancy pants, for sure.

Since dining here is slightly out of my price range, I was really excited to try a recipe from here.  Not only did I want to get a taste of what the high rollers get to experience, I wanted the chance to practice some different techniques and just see if I was up to the challenge of making something that's fine dining-style, as opposed to homestyle.

I was really fascinated by this recipe because it wasn't what I expected, in the absolute best of ways.  It ended up being a spectacular reminder that a few well-chosen, high quality ingredients prepared correctly can really knock your socks off.

As this is a cheese soup, my mind went immediately to perhaps the most famous cheese soup on property, and I expected this to be really similar.  However, it could not be more different.  Where the Cheddar Cheese Soup at Le Cellier is thick, creamy, and hearty, this soup is light, clean, and very thin.  The texture is more like your traditional broth soup and not a thick cream.  Designed to be a light soup course meal, this is a great alternative to people who love the flavor of that other cheddar soup, but not the heaviness.  Honestly, and I was told it was sacrilegious to say this, I feel like this soup is actually better than Le Cellier's soup.  While you could bulk it up with bacon for a taste that's both light and elevated, but slightly more hearty, I really think this soup is best appreciated as-is.

I think this recipe is a new favorite of mine and I wish I could do justice to describing the flavor.  The sharpness from the beer is obvious, but it's tamed by the snap of the cheese and the creaminess of the cream, making it a really bold and not overwhelming flavor.  While I can only have a bowl of the Le Cellier soup before feeling full, I ate a whole bowl of this and felt warmed, satisfied, but not heavy.  It's so amazingly delicious and perfect as both a cold weather comfort, or a light introduction to a gorgeous, luxurious dinner.         


~~~~  °o°  ~~~~

Roast Garlic and Gruyere Cream Soup
As is served at Victoria and Albert's, Disney's Grand Floridian Resort
 
°o°  4 tablespoons olive oil
°o°  10 cloves of garlic, crushed and roughly chopped  
°o°  1 small onion, chopped  
°o°  3 stalks of celery, diced 
°o°  1 leek, white part only, diced  
°o°  4 cups chicken broth, not unsalted  
°o°  6 ounces dark beer  
°o°  1 cup heavy cream  
°o°  1 cup Gruyere cheese, shredded  
 
In a large pot, warm olive oil.  Add garlic and cook, stirring constantly, until lightly browned.  Quickly add onion, celery, and leek and cook until tender and onion translucent.  Stir constantly.  Slowly add broth and bring to a rolling boil.  Lower heat, add beer and heavy cream.  Bring back to a low boil.  Using an immersion blender, blend soup until thinned.  Add cheese and stir until melted.  Strain the soup, then return to the stove and warm gently, discarding strained and cooked vegetables.  

Adjust seasoning with salt and pepper and serve.


~~~~  °o°  ~~~~

I know this is almost sacrilegious to say, but I've never had the school bread in Epcot's Norway Pavilion.  I know it's got a loyal, nearly fanatical fan base and I know saying I've never tried it is like saying I've never had the turkey leg or a Dole Whip...  But for some reason, I've never made space in my stomach to give it a shot.

The recipe is all over the place online and I've been saying for months that I'd try it, but like when it's at Epcot, I never got around to adding it to my "bake" list until now.  Doing a yeast bread that involves icing and custard, no matter how delicious it sounded, it seemed like it was a major investment in time...  And it was.  It's not a hard recipe, just one with a lot of
steps that takes longer than your average baked good.

I did follow the recipe exactly, but as anybody who's read this blog knows, making custard seems to never work out for me (as we can see here and here) and I was yet again defeated with this recipe.  While I got so, so, so close, I cooled it off too early, it was ever-so-slightly too runny still so I added whipped topping to thicken it off.  Brilliant solution that tasted fabulous, but I'm sure it made it taste less like it does in the parks.  Next time, I'll get pre-made custard or I'll just make pudding...  Which I mess up only about 50% of the time as opposed to 100% of the time.  Also, I ended up way more flour than the original recipe called for.  I'm not sure if it's because I might have used an extra half a cup of water, or if it just really needed the extra flour...  As written, the dough was so sticky and watery it was completely impossible to
handle.  And this makes a lot of school bread.  I ended up with 14 pastries.

I tasted this as it went along and it was really neat to see how each of the components came together to change it from being a regular yeast bread that was maybe even a little savory, like a dinner roll, but ended up being the right level of sweet and hearty.  I actually thought this would be like a doughnut when I decided to do this recipe.  It's more like Norway's answer to a sweet breads like cinnamon rolls, without the super sweet overload.  I really liked it and will go out of my way to have it next time at Epcot.


~~~~  °o°  ~~~~

School Bread
As is served at Kringla Bakeri Og Kafe, Norway Pavilion, EPCOT
 
Bread
°o°  2 pints water  
°o°  2 1/2 ounces melted butter
°o°  3 ounces instant or dry yeast  
°o°  2 - 2.5 pounds flour (with more available as needed)
°o°  3 1/2 ounces sugar  
°o°  1 teaspoon cardamom  
°o°  1 egg

Sugar Glaze  
°o°  2 cups confectioners' sugar
°o°  1/4 cup milk  
°o°  1 teaspoon vanilla extract  
°o°  12 ounces shredded coconut, shredded and toasted  

Vanilla Custard
°o°  1 2/3 cups milk 
°o°  1/4 cup sugar  
°o°  1/4 teaspoon vanilla extract  
°o°  4 egg yolks  
°o°  1 tablespoon cornstarch dissolved in cool water  

Bread
Add warm water to melted butter (about 90-95 degrees) and add yeast and let stand 2-3 minutes or until mixture starts to froth.  Add flour, sugar, cardamom, and egg.  Mix 5-10 minutes until dough stiffens, adding more flour as needed.  Cover tightly with plastic wrap and allow to rise 1 hour, or until dough doubles in size.

Punch down dough and roll dough into a thick log, handling as little as possible.  Cut dough into 5 ounce portions and roll into a ball. Do not press down!  Place them on a greased baking sheet and allow them to rise another 15-30 minutes, until the dough has risen and puffed, but not spread.

Bake in an oven preheated to 375 for 15 minutes.  Breads are done when they have a slight crust and the bottoms have browned slightly.  Let cool on a wire rack.  When cooled, hollow out an area for the filling in the middle of the bread, making sure to not go all the way through the bread.

Sugar Glaze
Combine all ingredients except the coconut to form a thick glaze.  Working quickly with one bread at a time, dip bread hole-side down in the sugar glaze and coat with toasted coconut.  Return breads to wire rack to dry.

Vanilla Custard
In a saucepan, bring milk to a boil.  Remove from heat and set aside, skimming away the
skin.

In a bowl, beat sugar, extract, and egg yolks until mixture has doubled.  Do not over mix.  Put mixer to low and slowly add several spoonfuls of warm milk to temper the custard mixture.  Then slowly stream milk into mixture and mix until just incorporated.  Transfer to a metal bowl or top portion of a double boiler.  Over a double boiler, slowly add the dissolved cornstarch to the custard mixture and stir gently and constantly until mixture thickens.  Do not allow to boil.  When warmed and thickened, move bowl to an ice bath to cool completely.

Once totally cooled, using a piping bag, pipe custard into pastry and finish with a decorative dollop or swirl.


~~~~  °o°  ~~~~


This post was featured in the Februrary link party "Ride the Rails" featuring topics related to Disney's "Frozen" in the Disney parks, hosted by "The Magical Blogorail."


Chef Ramsay says making chocolate lava cake is one of the hardest baked goods to make.  Cook it too little, it collapses on itself.  Cook it too long, it's basically a brownie that is slightly underdone.

Challenge accepted Chef Ramsay.

I've only actually had a lava cake twice...  The first time I made it myself, not really knowing what I was making.  I remembered it tasted good, but it was before lava cakes were really a thing and everybody I served it to thought I had just an underdone cake.  Dramatic effect was nulled by suspicious questions of "are you sure you cooked it enough?"  The second time I had lava cake was actually at a local Italian restaurant and it was overdone.  I cut into it happily waiting for my rush of "lava" and...  Nothing.  It was like slicing into a cake.  Talk about disappointing!

When I made this and got it right on the first shot, I'm not going to lie, I felt a huge sense of accomplishment.  Watching the chocolate flow out of the cake is just so fun and so cool.  I wish I could describe the taste...  It's really, really chocolatey without being sweet or bitter.  Since I'm a lover of warm desserts, this was the perfect mix of cake and gooey warmth.  It's a chocolate lover's dream!

The cake itself is very easy to make, it's the timing on the baking that's a real trick.  My three tips are make sure that you grease the dickens out of the custard cups for the cake and put a ton of sugar in to coat.  That makes getting it out so much easier, and it increases the chance that your cake won't fall or get nicked when you're taking it out of the custard cups.  Second, watch these in the oven like a hawk.  Your window of opportunity on getting this right is so, so, so short.  This more than any recipe I've done is relying more on judgement as to if it's done and not a flat cooking time.  Third...  When the top starts to crack, the center is firm, but it doesn't spring back when lightly touched, and the edges start to pull away from the cup...  Then it may be done.  Pull it out, run a knife around it, pop it out as gently as possible, and serve it immediately.

I think this is certainly one of the most fun desserts I've served in awhile and it was a huge hit around the house.  I loved how dramatic it was cutting it open and its the perfect non-traditional, almost fancy dessert that really makes an impact.  And it taste like heaven!


~~~~  °o°  ~~~~

Chocolate Lava Cake
As is served at California Grill, Disney's Contemporary Resort
 

°o°  8 ounces semisweet baking chocolate  

°o°  1 cup butter  
°o°  5 egg yolks  
°o°  4 whole eggs
°o°  3/4 cup granulated sugar (and more for dusting pans)  
°o°  1/3 cup all-purpose flour
°o°  powdered sugar, for dusting

Preheat oven to 375 and grease custard cups with butter or non-stick spray.  Coat with granulated sugar and shake out the excess.  Set aside on a baking sheet.

In a double boiler, melt chocolate and butter until completely melted, incorporated, and smooth when mixed.  Remove from heat for about 10 minutes to allow it to cool slightly.

In a separate bowl, combine eggs and beat using an electric mixer.  After eggs are thoroughly beaten and are a lemon color, add sugar.  Beat vigorously for several minutes until incorporated and slightly airy, but still thick (like a custard).  Drizzle in cooled chocolate mixture and fold until blended entirely.  Sift in flour, mix lightly for another minute.

Pour into prepared cups until about 3/4 full.  Bake at 375 for 25-35 minutes depending on your container.  When the top is set, the sides are beginning to pull away from the dish, but the center does not spring back when touched, cakes are done.  Do not overbake.

Run a butter knife around the edge of the cake and dish to loosen, place a plate face down over the dish and flip.  If the cake does not come out, hit it slightly to loosen further.

Serve immediately dusted with powdered sugar and served with ice cream, if desired. 


~~~~  °o°  ~~~~

Ah, Mama Melrose's Ristorante Italiano...  What is there to say about Mama Melrose's?  I'll be honest, if it wasn't for the Fantasmic! Dinner Pacakge I probably wouldn't have eaten there...  Why?  Well, honestly...  I never knew it existed.  When I got the reservation for it the first time, I actually had to consult a map on where to find it.  In the dozen or so times I'd visited Disney, I think it was the one and only restaurant I knew nothing about.  And the reviews for it left me kind of cold.  Good, but not great seemed to be the general word-on-the-street.  I actually remember telling my family before we went that I kind of regretted we were eating there, but I really wanted the good seats to Fantasmic!.

Then, the refurbishment...

Two months before we arrived, Mama Melrose got a menu overhaul and a new chef and the new buzz was that the food was actually pretty awesome.  Then my little "I feel like there are better places to eat, I just want to see Fantasmic!" reservation turned into "Wow, I can't believe you managed to a reservation there!  The food is amazing and everybody wants to get a meal there!"

I love it when I stay on the cutting edge of Disney food trends through complete and total accident.

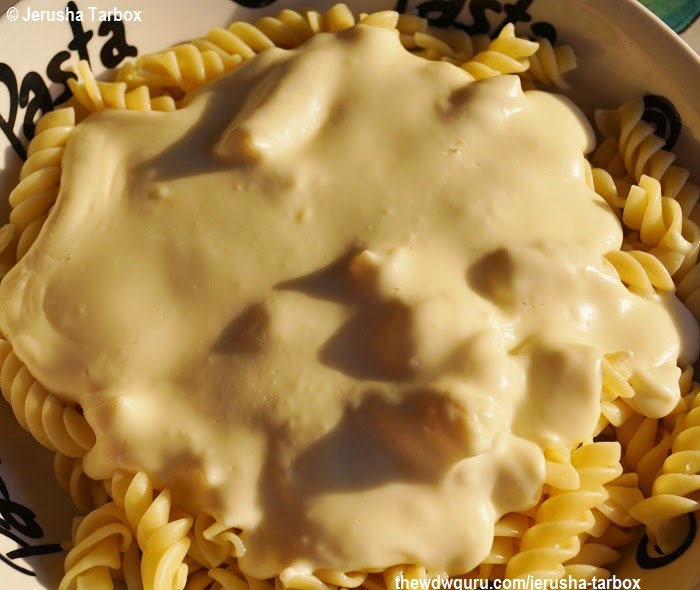
This four cheese sauce is actually still on the menu now, and after making it, I kind of regret not ordering it while we were there.  It's kind of a grown-up mix between mac-and-cheese and alfredo.  Not as in-your-face cheesy as mac-and-cheese, but not as subtle as Alfredo.  While I served it with just the sauce (as they used to do until about a year ago), so much can be added to this to make it pop even more.  Chicken, pork, bacon, pancetta, prosciutto, vegetables...  Right now, they serve this with sun-dried tomatoes soaked in sherry and broccoli flowers.  While they normally serve this with penne pasta, I went the rotini route (hahahaha) and it tasted just wonderful.  Such a great pasta for really absorbing sauce!

This is super easy, something my 4-year-old helped me make with no problems.  Plus, it was a big, big hit for dinner.  The only thing that would have made it better was to be able to go walk to front row seats at Fantasmic!.      


~~~~  °o°  ~~~~
Four Cheese Sauce
As is served at Mama Melrose's Ristorante Italiano
 
°o°  1/2 stick butter  
°o°  3-4 cloves garlic, minced finely
°o°  1/4 cup flour  
°o°  1/2 quart half-and-half     
°o°  1/2 quart heavy cream  
°o°  1 ounce Reggianto Cheese, shredded  
°o°  1/4 cup Parmesan cheese, shredded  
°o°  1 ounce Asiago Cheese, shredded  
°o°  2 ounces Fontina cheese  
Melt butter and add garlic, stirring for 1 minute.  Add flour to make a roux.  After butter and flour mixture has thickened, add half-and-half and whisk constantly, bringing to a boil.  When mixture has thickened, add heavy cream and cheeses.  Mix until cheese mixture has melted and the sauce is smooth and creamy.

Serve over pasta.


~~~~  °o°  ~~~~